When you pin something on Pinterest, what do you do?

{Somewhat Sparkly}

{Somewhat Sparkly}
I love my life!

{Search This Blog}

{Sparkly Friends}

Tuesday, June 26, 2012

{Home Sweet Home}

ok, I've been trying to do things around the house and wanted to share a few finished products...we still have a long way to go, but I'm loving each part of my house more and more each day.  Here are a few pics I want to share! :) 

First off, is my little Princess Baleigh's room.  My best friend, Stephanie, made a pink and sparkly chandelier to hang in her room and I think it is just adorable! It was her birthday gift to Baleigh :) Thanks Steph!

Here is a picture of that whole side of Baleigh's room...she has the princess bed and furniture and I think the chandelier just adds the right touch of royal cuteness! :) Love it!  

Living room/family room photo collage :) **I love it and plan to keep adding to it  (Note my no sew pillow covers sitting there on the couch!) :) 

Monday, June 25, 2012

{The Princess is 3}

My princess, Baleigh Lauren, turned 3 today! We had her party yesterday though and it was a royal success :) I was so happy with everything and the best part was Cinderella came to the party! It was wonderful and Baleigh was so excited.    (I had full plans for an outdoor party, but due to rain we were inside and it turned out fine.) 

The boys made shields (Cinderella brought these for the boys to create and they loved them!)...it's just posterboard and we got out crayons! Plus we glued a strip of posterboard to the back for the handle.  

My sweet little Rylie Kate in her Cinderella dress with Cinderella :)  

The cake table! My friends Stephanie and Amy (of Partybirds...find them on Facebook!) made the cake and I loved it!!! It was vanilla, but like a cake we found on Pinterest they created different shades of pink layers for the cake and put real strawberries in the layers--it was delicious!  

Fancy fruit :) I had star cookie cutters so we cut out stars for the watermelon...they were so cute! :)  

Veggie Cups...I just love these and for some reason they get eaten up! I promise every time we have bought a veggie tray it will sit there untouched and when they are served in a cup they get gobbled up! Note that the carrots are from our garden! :) woo hoo!  

Peanut Butter & Jelly Crowns!!! These turned out so cute! I bought the crown cookie cutter on Amazon and voila....PB&J's! They were yummy too!  


More cake pics! :) 

The Birthday girl! She was dressed as her favorite princess- Sleeping Beauty :) 

Cinderella brought the dress ups and the girls loved them! Baleigh changed to Ariel halfway but quickly decided she still wanted to be Sleeping Beauty so changed back.  Some of the girls did 3 wardrobe changes during the course of the party! :)  

Goodie bag table! :) The frame hanging is from hobby lobby and was grey and had a mirror in it....it was plastic and $4!!! I spray painted it pink and went to a friend's who has a cricut machine and she punched out the Once Upon a Time for me! I love it! (It was on the door, but the storm winds kept knocking it down so we hung it here and I loved it!)  --as for goodies, the girls got the princess bags (that I made with hot glue!) and the boys got the other goodie bags--left over from RK's owl party! The boys also each got a sword, which you see in the vase.  

Princess bags-- I had so much fun making these! Here you can see (L-R) Ariel, Sleeping Beauty, and Jasmine...I also made Rapunzel, Belle, Snow White, Tiana, and Cinderella :) They were a hit!

Close up of the Once Upon a Time frame :)  

Close up of the swords...they were $1 from Target....(I love the $1 section!)

The birthday table! My friend Stacy @ Pinkadot Shop made the bannder along with invites, the welcome sign, and food labels ---find her on etsy!

Another angle :)  

Baleigh and her BFF Allie waiting to blow out the candles :) --funny thing is they wore eachother's dresses for the party! :) 

The cake is ready for eating :)  

This is my wonderful grandmother, Mama B! (Baleigh's great grandmother) :) Just had to share b/c I love this picture of the two of them!  

Saturday, June 23, 2012

{No Sew Pillow Covers}

This is one of my favorite projects thus far because it was soooo easy! I can't sew so I'm all about anything that has "no sew" in the title.  :) We recently got a new couch and it came with pillows that match the couch....I put a before picture first in my step by step instructions.  Side note:  I found this project on Pinterest like most of my projects :)  
Materials needed:  pillow to cover, material of your choose (I did a yard and 1/2 per pillow....you will need enough extra material to tie in a knot on the pillow) 

Before Picture:

Step 1:  Lay out your material and place the pillow in the center

Step 3:  Fold material halfway up on the pillow

Step 4:  Fold other side of material over onto the pillow so that pillow is now completely covered

Step 5:  Fold ends into points (like when you wrap a present)

Step 6:  Fold sides up onto the pillow like picture below

Step 7:  Take pointed ends and tie in a knot like below (originally I stopped here and tucked in the ends of the ties, but I don't think 1 knot would stay--especially with 2 little ones in the house so I opted to double knot the covers...the Pinterest instructions said to do a square knot, but I was apparently absent that day at girl scouts) 

Final picture! Here they are double knotted :) I love them and so easy and inexpensive! 

Sunday, June 17, 2012

{Happy Fathers Day}

I love my husband, Austin, with all my heart! Nothing makes me happier than seeing him with his 2 girls.  I took an idea from Pinterest and created it and it was so much fun! **Sidenote:  My sister actually took the idea and bought the letters for it...I just painted them, bought the frames, and took the pictures then had them developed! Below are the frames we created...for my husband and for my brother-in-law :)    

**I purchased the 2 frames at Target and I believe they were 3.99 each so inexpensive and adorable, plus a priceless keepsake! 


Austin's Frame:  (Baleigh woke up from her nap on the wrong side of the bed so she is the first D and that was the best face I got out of her!) I need to retake that pic without so much glare--you get a better idea from my nephew below them.

My brother-in-law, David's frame:  He is adorable, isn't he? :)  

Happy Fathers Day to all the Dads out there! :) Until next time.....

{Heavenly}

ok, this recipe was given to me by one of my yearbook students and I changed it up a little (well took out one ingredient, but it's great both ways!)   Here is the recipe though and ingredients and a few pictures of the process! Enjoy :) 

Ingredients:
Your favorite brownies (if from a box make sure you know what you need to make the batch of brownies)
1 box of Chocolate instant pudding
1 container of cool whip
1 bag of heath bar crunchies 
1/2 cup of coffee (liquid coffee and this is the ingredient I left out....it's delicious either way!)

Step 1:  Make your brownies according to the directions on the box....then put half of the pan in a bowl and save the other half for another layer :) 

Step 2:  Mix the pudding mix and then put aside...scoop half of the cool whip on top of the brownies then sprinkle about 2-3 tablespoons of heath bar crunchies over the cool whip...then layer with 1/2 of the pudding mix 
 Close up of brownies, then cool whip, then crunchies....
Step 3:  Repeat the layers so that you end with pudding on top and then sprinkle about 1-2 tablespoons of crunchies on top...refrigerate until serving  
**if you are adding the 1/2 cup of coffee you pour 1/2 in over the brownies each time you place them into the layers (so 1/4 cup each time)

This dessert is to die for!! You will find that it's delicious so go make some and enjoy! :) Until next time....

Saturday, June 9, 2012

{Whoooo's Turning 1? My Sweet Rylie Kate}


My sweet RK was born June 9, 2011 and today we celebrated 1 year of having her in our lives! We had so much fun! I found owl ideas and other party ideas on Pinterest....love that site! Here are some party pics...
Owl Banner :)   
(I found a pin on Pinterest that was for free owl printables....here is the site:  http://party.tipjunkie.com/free-owl-birthday-party-printables-birthday-party-printables/ ) 


Food table 

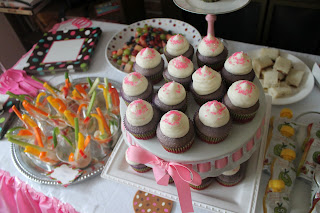
Birthday cupcakes!

Owl Smash cupcake for Rylie Kate :) 

Owl decoration

Veggie Cups....yum! 

Cupcakes!

Yum! :) 

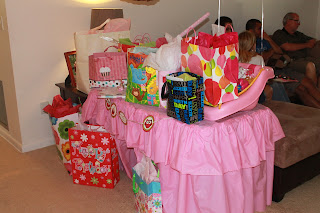
Tissue flowers over the present table...notice my ruffled table skirt...found that on Pinterest! Soooo easy!

Another pic of present table decor...small banner there on the front

 Presents

Goodie Bags :) Pink for girls, blue for boys

All the bags...they contained fruit snack, pack of goldfish, play doh, and a small thing of bubbles 

Birthday welcome sign :) 

Our little family :) 

RK examining her cupcake! 

Owl making station....the kids picked their parts and used glue sticks to put them together...it was so much fun! I just wish I had taken some pics of them putting them together!

A finished owl :) 

Another finished owl  :) 

Thank whoo for checking out my party pics! :)